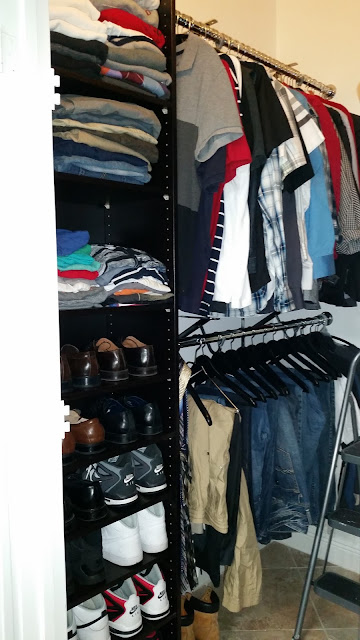
So here we are about a year later and we just are not happy. It is not the right fit for us. So after researching for a month on what we could do on a budget. I finally had my plan. We took a trip to home depot and started constructing. I can't post any befores because my laptop that has the pictures is down but I promise I will post them soon.
Here we go
I'm going to give you my list but you can do it with different brackets, hardware and poles. I used chrome because I like the bling and it just looks more expensive than the white or wood ones. Just my preference. Now our wardrobe cabinets are the taller 93.5 inch version because our ceilings are high and vaulted but if your closet has normal ceilings you can get away with getting smaller ones which cost less than ours did. Plus if your not a shoe hoarder like me you can use less shelves in them which will cost less too. We gradually bought more shelves each month.
List
- Big shelf for shoes ,this was part of our original purchase from Ikea $160 with shelves exact here /shelves here
- Smaller cabinet for clothing storage, ours was from original purchase from Ikea $120 with shelves exact here/ shelves here
- 12 Shelf/wall brackets, we uses 2 per hanging pole just because our drywall sucks cost $90 exact here
- 5 Pole socket packs we used these as extra support plus to finish off the look $30 exact here
- Dry wall anchors and screws, we used butterfly clips because our drywall sucks, when using butterfly clips just know they require bigger holes than screws so make sure you triple check where to hang everything before you start drilling, our cost $15
- Shelves in color of cabinet , I purchased only 2 for Top shelves only because that is all that was in our budget, our cost $18 exact here
- Chrome Poles they come in 96 inch pieces we needed 2 our cost $55 exact here
- Pole cutting utensil hubby already had this
Our total cost $205- a $25 credit we had. Total was $180 at home depot now plus $280 from ikea for old setup. You can get this exact layout for cheaper if you use white poles and brackets and smaller cabinets. You can also use no brackets and only wall sockets depending on what kind of walls you have. Our drywall and metal studs are crappy so whatever we do int the closets we always use brackets and wall sockets for support. We bought a side at a time. Total completion time 1-1/2 weeks, but it can all be done in a day or 2 if you or your hubby is very handy and not extremely busy like mines.
Supplies
The process
Picture of 2 cabinets we removed and the shoe cabinet we kept
My side after we removed cabinet and patched and started to paint
Just some of the old holes being patched
First shelf complete and here we are putting the pole sockets into place, sorry I didn't take many step by steps, but how we measured where the pole sockets go, we put pole socket on end of pole and popped it into bracket and used a pencil to fill in where screws were going to go on the wall. Then take it back out drill holes and then attach pole socket to wall.
How we measured brackets were by putting a level on first bracket once it is level mark holes, drill and install it in place. T o measure the next bracket we put a small shelf on top of both brackets level it with a level and we marked the holes with a pencil, and then drilled and installed second bracket. After that me measured and cut pole than installed pole sockets to wall first and then onto cabinet.
His side working on bottom rod and mounting wall sockets into place
Finished installing socket onto shelf we used small screwsf or this
His side completed but missing top shelf he has 2 hanging storage poles and 1 shelf on top for hats the small ikea cabinet hold his shoes, shorts sweaters and t-shirts.
Here is a front view of it finished
Here is my side finished . We still need to add shelves to the top for more purse and bag storage. I have 3 hanging areas 1 for purses, 1 for blazers and jackets, and bottom is for blouses. My jeans are hanging on his side lol. My hanging area was 8 inches smaller than his side, because we kept the shoe cabinet in there.
Hope you enjoyed this post. I promise to take more pictures of the action!
God bless,
Lea
Hope you enjoyed this post. I promise to take more pictures of the action!
God bless,
Lea


No comments:
Post a Comment